Building Your Dream Lean-To Shed: A Comprehensive Guide to Framing
Hey there, fellow DIYers! So, you're thinking about building a lean-to shed? Awesome! Lean-tos are fantastically versatile structures – perfect for extra storage, a workshop, or even a charming little potting shed. This guide will walk you through the framing process, from laying the foundation to nailing on the last roof shingle (almost!). Don't worry, we'll keep it friendly and straightforward, even if you're a complete beginner.
Planning Your Lean-To Shed: Before You Even Touch a Hammer
Before you get carried away with visions of perfectly stacked firewood and neatly organized gardening tools, let's do some planning. This stage is crucial; it'll save you headaches (and possibly some costly mistakes) down the line.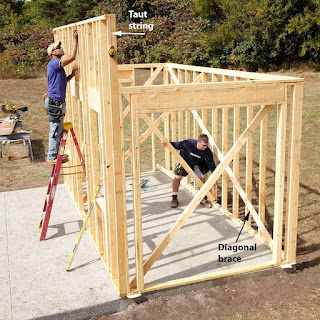
1. Size and Location:
First things first: how big do you need your shed to be? Consider what you'll be storing or using the space for. A smaller lean-to might be perfect for tools, while a larger one could house a workshop. Don't forget to measure the area where you plan to build it – ensuring you have enough space and that it's level. Consider sun exposure, prevailing winds, and proximity to existing structures.
2. Building Codes and Permits:
This is often overlooked but super important! Check with your local building department to see if you need a permit. Building codes vary, so understanding the regulations in your area will save you potential fines or even demolition orders later. This usually involves submitting plans, showing compliance with things like setbacks from property lines, wind load considerations, and foundation types.
3. Materials List:
Creating a detailed materials list is key. You'll need lumber (pressure-treated for the foundation, possibly for the framing as well, depending on your climate), roofing materials (shingles, metal, etc.), fasteners (nails, screws), and possibly concrete or other foundation materials. Consider making a detailed spreadsheet or using a home improvement store's online planning tool to help estimate quantities.
4. Tools You'll Need:
Gather all your tools before you start. This is far less frustrating than discovering you're missing a crucial tool halfway through the project. You'll need basic carpentry tools like a measuring tape, level, saw (circular saw, hand saw, or reciprocating saw), hammer, nail gun (optional, but highly recommended!), shovel, post hole digger (if necessary), and safety glasses.
Laying the Foundation: A Sturdy Base for Your Shed
A solid foundation is the backbone of your lean-to. The type of foundation you choose will depend on the size of your shed, soil conditions, and local building codes. Here are a couple of common options:
1. Concrete Slab:
For larger lean-tos or areas with unstable soil, a concrete slab provides the most stability. You'll need to excavate, create a formwork, and pour the concrete. Ensure it's level and allow ample curing time before proceeding. This method is more time-consuming and requires more materials.
2. Gravel Base with Pressure-Treated Skids:
A simpler and often quicker option, especially for smaller lean-tos, involves creating a level gravel base and placing pressure-treated lumber skids on top. This is less permanent but perfectly suitable for many projects. Make sure the gravel is well-compacted to prevent settling.
Framing the Walls and Roof: The Structure Takes Shape
Now for the fun part – building the actual structure! Here's a step-by-step breakdown:
1. Wall Framing:
For a lean-to, you'll likely only need one wall (the back wall) unless you're building partitions inside. Start by constructing the wall frame using pressure-treated lumber for the base plate and studs. Use a level to ensure everything is perfectly plumb. Remember to add bracing for stability.
2. Roof Framing:
This is where the lean-to design comes into play. The roof will be attached directly to the existing structure (like your house or garage). You'll need to determine the roof pitch (angle) and cut the rafters accordingly. Use a speed square or a rafter square for accurate cuts. Ensure proper overhang for weather protection. Use strong roof trusses for added support, especially for wider sheds. Connecting the rafters to the existing structure is crucial; use appropriate fasteners and consider using metal brackets for added strength and stability.
3. Sheathing:
Once the frame is complete, apply sheathing to the walls and roof. This provides a solid surface for your siding and roofing materials. Plywood or OSB (Oriented Strand Board) are common choices. Ensure proper overlap and secure the sheathing with nails.
Finishing Touches: Siding, Roofing, and Doors
With the framing complete, it's time to add the finishing touches:
1. Siding:
Choose your siding material – vinyl, wood, metal, etc. – and install it according to the manufacturer's instructions. Make sure it's properly sealed to prevent water damage.
2. Roofing:
Install your chosen roofing material – shingles, metal roofing, etc. Proper installation is key to ensuring a watertight and durable roof. Consider using roofing felt or underlayment for added protection.
3. Doors and Windows (optional):
If you're planning on having a door for access, this is the time to install it. Frame the opening appropriately and ensure a proper seal. Windows are a nice addition, adding light and ventilation.
Commonly Asked Questions
Q: How much does it cost to build a lean-to shed?
A: The cost varies greatly depending on the size, materials, and your labor costs. Expect to spend anywhere from a few hundred dollars to several thousand. Careful planning and material sourcing can significantly impact the overall cost.
Q: What kind of permit do I need?
A: This depends entirely on your local building codes. Some areas require permits for even small sheds, while others may not. Check with your local building department.
Q: How long does it take to build a lean-to shed?
A: The construction time also depends on size and complexity. A small lean-to can be built in a weekend, while a larger, more complex one may take several weeks.
Q: Can I build a lean-to shed by myself?
A: It's possible, especially for smaller sheds, but having a helper is highly recommended, particularly for lifting and positioning heavier materials. Safety is paramount, so don't hesitate to ask for assistance if needed.
Q: What kind of wood should I use?
A: Pressure-treated lumber is recommended for the foundation and ground-contact framing to prevent rot and insect damage. For the rest of the framing, consider using high-quality lumber suitable for exterior applications.
Remember to prioritize safety throughout the entire building process. Wear appropriate safety gear, take your time, and don't hesitate to seek professional help if you're unsure about any aspect of the project. Happy building!
Sign up here with your email
ConversionConversion EmoticonEmoticon